WHY SHOULD YOU LISTEN TO US?
We will walk you through how the elite brands have done it and what the takeaways are. AVmade Design Studio is here for creators and elite clothing manufacturers to work seamlessly {no pun intended}. Starting a clothing brand is a complex and expensive process. The majority of brands that achieved mainstream success are mainly due to family ties or extensive industry connections. We know it’s not fair, but you know what they say about Fair!
We started AVmade Design Studio to solve that specific issue so the spirit of entrepreneurship can truly flourish. We understand many entrepreneurs don’t have a lot of capital to invest, so we made it our mission to significantly lower the barrier to entry regarding MOQ and price while maintaining superior quality products only those with lots of capital could access.
We know as bootstrapped entrepreneurs ourselves, it takes a few trials and errors until something sticks. Plus lots of TLC and guidance to make it to the promised land. So by keeping the barrier to entry low, we hope you get a fair shot in attempting to build your brand without breaking your bank or going into debt.
FACTORY NETWORKS ARE EVERYTHING
We will share our database with you. Our team at AVmade“aka” (The A-team) had built an extensive working relationship with nearly all of the elite clothing manufacturers in the USA. We assisted many of the globally famed brands for over a decade to build, manage and manufacture. Before AVmade.com, our priority was helping those who were well-financed and well-capitalized. Our founding team decided best to construct a missionary company rather than a mercenary. Today our mission is to support emerging brands achieve great success by removing barriers and giving them the leverage large brands had. If you go out on your own, be sure to cut middlemen like agencies and take your time to find the factory that will suit your brand.
The process of starting a clothing brand encompasses many moving parts. In this course, we will talk about what you need to master. We know entrepreneurship is challenging, costly & frustrating, but you’re not alone. The “A-Team” aims to be the best guide for all your brand building needs & to answer any questions.
11 PROCESSES TO MASTER WHEN STARTING A CLOTHING brand
- Consultant
- Design Tech-pack
- Pattern Making
- Fabric Textile
- Calculating Yielding
- Getting Sample (prototype)
- Grading Sizes
- Marker to Cut
- Production Sewing
- Costing Out Production
- Pricing (mark-up)
I. CONSULTANT
Do you need consultation?
Looking at the traditional fashion industry practice, YES, a consultant is needed to discuss the information we cover here on MasterPernurship courses. If you don’t have time to read and rather pay someone to answer questions, then YES, having a consultant helps. The most significant risk that we often hear from our brand partners is getting the wrong information from so-called experts. The fashion industry is not very transparent (at all). Until AVmade, it has never been a source for fashion entrepreneurs to seek information freely and to see fair pricing and price transparency for products they want to develop.
We provide a free 30 min. Consultation to help guide you if needed. AVmade Design Studio (the A-Team) has decades of experience in the fashion industry, from launching brands to helping scale many of them into multi-million dollar companies. All the information you will read on Master Preneurship comes from our apparel executive team. To give you a background on us:
- Founders of successful clothing brands
- Founders of elite clothing factories
- Corporate executives
Our goal is to be a beacon to our community of entrepreneurs who are serious about building a successful brand. Hopefully, you’ll be savvy enough to come to seek answers to your questions here or ask before depleting your bank account. When starting your business, every dollar you can save is a win. The information we provide here is free, but most charge anywhere from $150 to $500 an hour.
So if you have any questions we did not cover in our MasterPreneurship course, contact us anytime, and we will fill in the gaps for you.
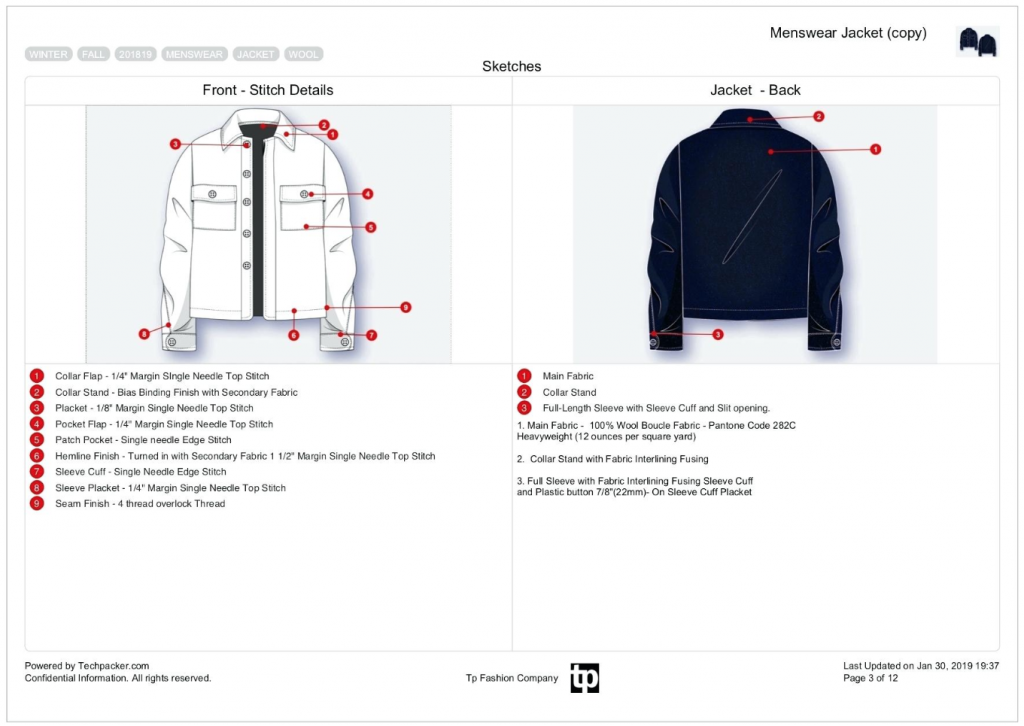
II. TECH-PACK
What is a clothing tech pack?
A tech-pack, also known as a technical package, is used to give clothing manufacturers precise measurements and specific details for the style you want to develop. Tech-Pack provides factories a spec (specification) to follow as they create the desired style according to each brand’s inquiry.
It can be confusing what information you need to provide the clothing manufacturer. Before you panic, breathe; you don’t have to be an expert to give specifications on a style you like. Ten years old can do it using our guidelines. Yes, it’s that simple. Here is what you need to,
- Template. You can download it here. Plus, download the template example to follow.
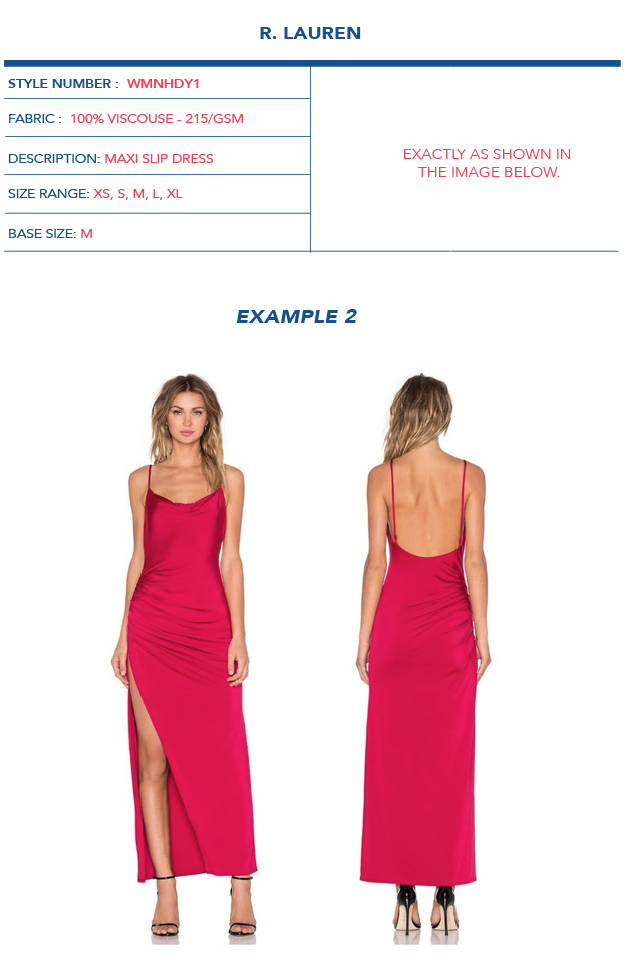
- Sketch. If it’s a popular silhouette, google it, copy and paste the drawing onto your template. If there are back or side details, then make sure the sketch shows them. If it’s not popular or you can find it, layout the garment on the floor, take images of all angels and have a graphic designer on Fiverr convert it into a stencil for $10-$15.
- Style Number. Choose the best way to proceed with naming your style that is easy to remember and communicate with others. The rule of thumb is mainly for startups; use a 4-6 digit number and letter mixed.
Ex. CNT1 or VNTN2 is an acronym for,
- Crew neck tee, the first version
- V-neck tank, the second version, and so forth, You get the point.
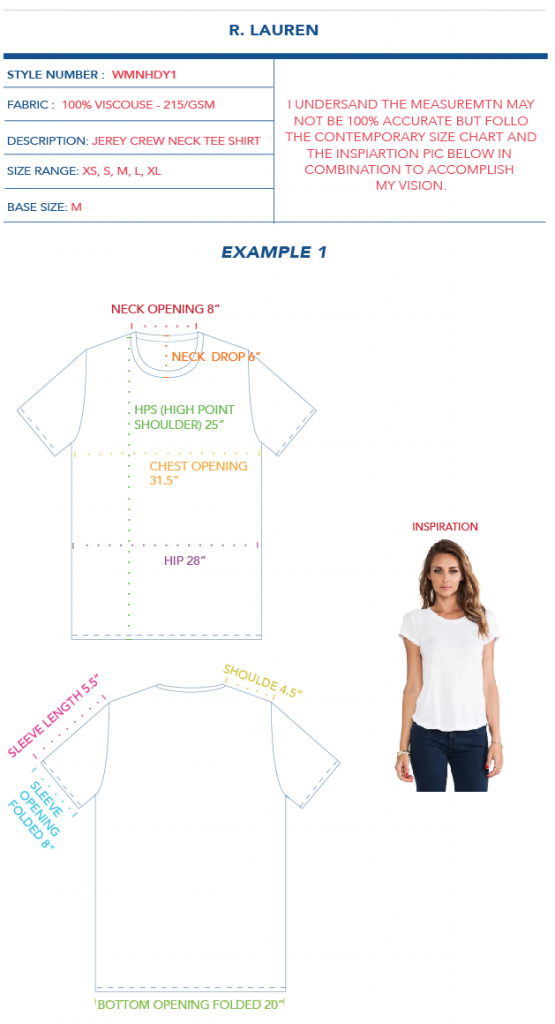
- Measurement. Just let us know the base size. Such as
- If it’s standard sizing, then XS, S, M…
- Plus size 1X,
- Kids 2T,
- And so forth.
A legit factory will have access to data for the “U.S. standard contemporary clothing chart.” If not, that’s your cue to move away. Do not ever provide your sizing thinking somehow you are the perfect representative for all size M. This is how you shoot yourself in the foot. If you are a pro with extensive industry experience and aim to cater to a niche market by modifying the standard measurements, please do. Otherwise please don’t do it.
It’s not rocket science; it’s straightforward. Download Tech-Pack Template or AV Plus to submit your design to get a bidding quote from clothing manufacturers.
Does a tech pack help?
The answer is yes if the style you’re developing is unique and it is something that no factory has pre-developed on AVmade Design Studio. If it is on AVmade.com, all you have to do is save yourself time and money by iterating it according to your need and submit it for production. Otherwise, prep a tech pack and submit it for our factory partners to bid on it on AV plus. It is a free service for all of our members.
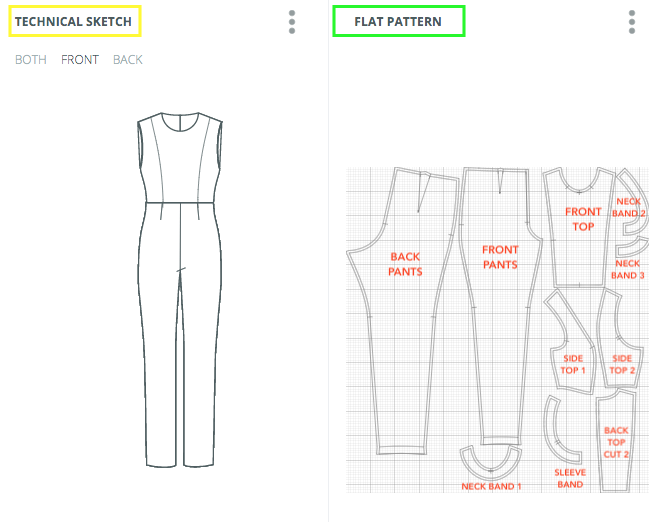
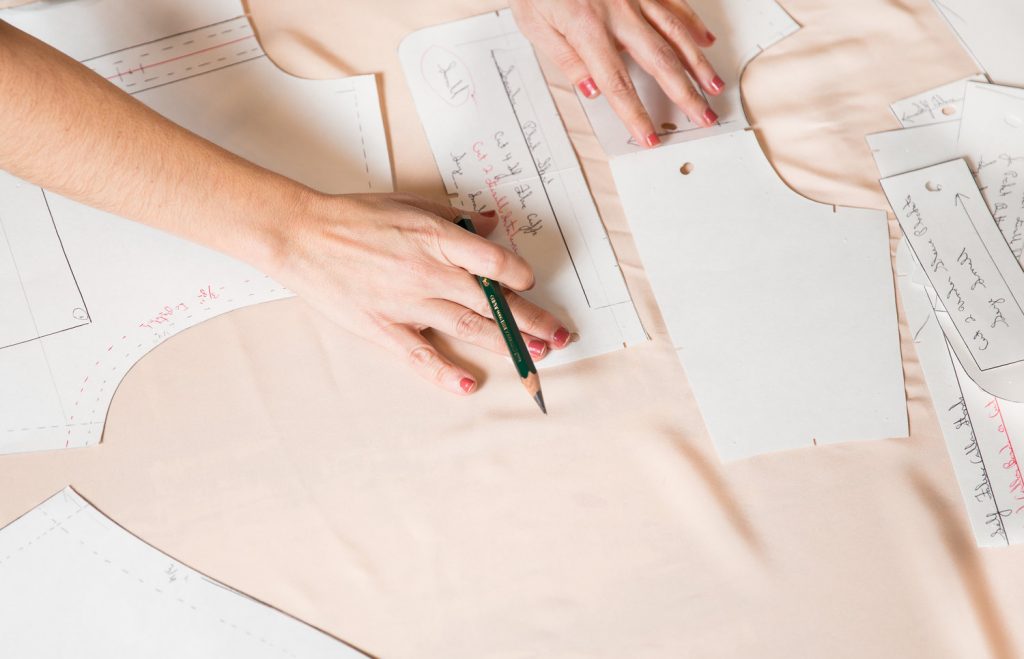
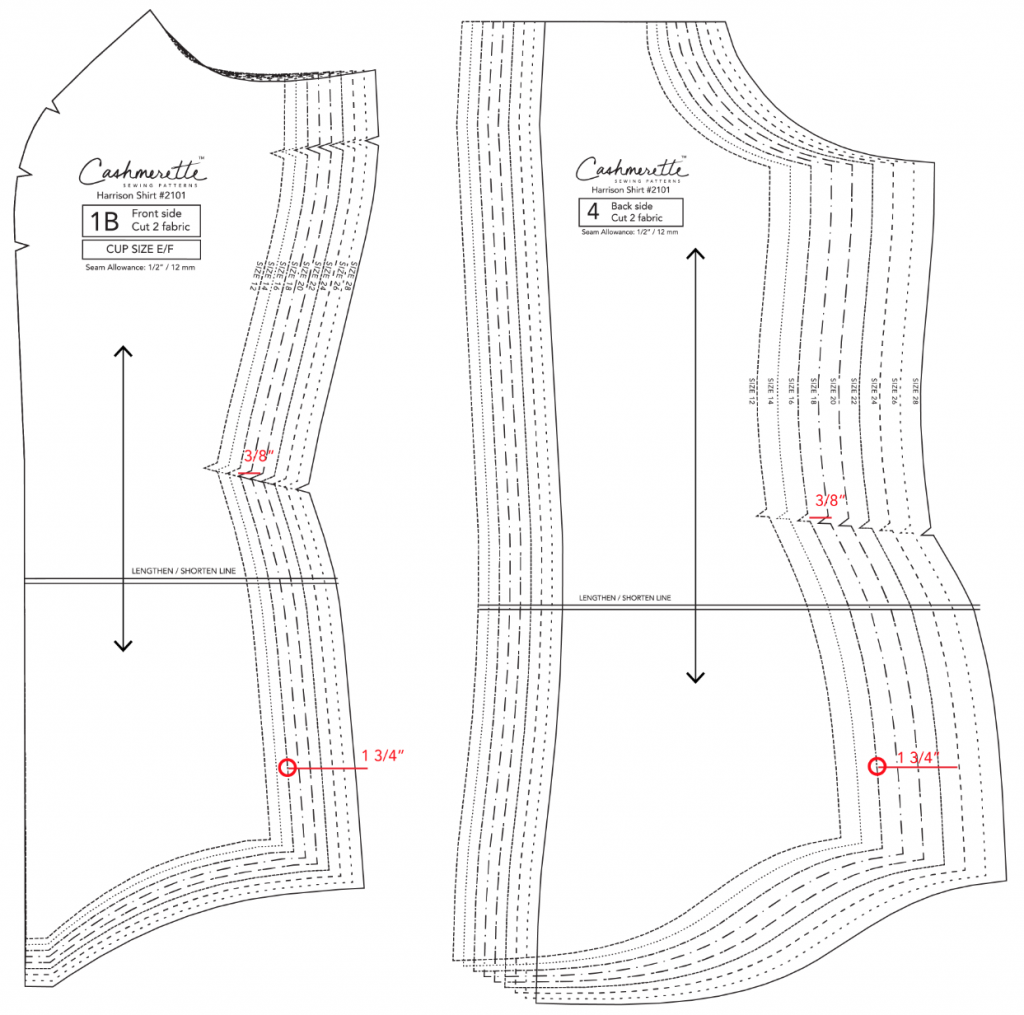
III. PATTERN
What is a clothing pattern?
A Pattern for clothing manufacturers is like a blueprint for home builders. It provides the blueprints of the garment for a factory to follow to produce the garment. A professional clothing pattern maker would create CAD shapes that fit in a way a jigsaw does depend on the designer’s needs according to the aesthetic of your design.
How important is a pattern?
A pattern to a clothing manufacturer is essential, as we discussed above. Every style is different from one to the next, therefore for each style, a well-developed pattern is critical. When starting a clothing brand, like every home needs an architect to create a blueprint, your style will require a carefully molded blueprint (pattern) with all the details from a pattern maker first.
A pattern maker will take many things under consideration when starting to create pattern pieces (CAD). Such as,
- Fabric content. Different textiles make a difference. Such as cotton, modal, silk, wool, and more. They all have different torque, stretches, drapes, shrinkage, and many other reactions. Even within the same group of fabric made by different mills will make a difference. A pattern maker will keep these variables in mind while drafting, draping, and testing as they form the CAD.
- Fabric weights. Is it super light, light, medium weight, or heavyweight? The different weight categories will impact the garment’s aesthetic and fit.
- Fabric stretchability. Depending on how much stretch or how little also impacts the fit and drape of the garment.
- Garment fit. Slim, relaxed, loose, oversize, etc., will also have to be considered even within the same product category. Each variable of fit needs to be accounted for to ensure the final result is spectacular. An example, in a t-shirt, there can be hundreds of varying fits depending on a combination of design aspects starting from,
- Fabric. All the variables we discussed above.
- Body types. Standard, petite, plus.
- Length. Standard, petite, tall.
- Demographic. Children, teens, adults, elderly, etc.
- Gender. Male or female
- Fits. Fitted, slim, standard, relaxed, boxed, oversized, etc.
- Aesthetic. Crew, v-neck, boat neck, scoop, etc.
- Sleeve. Long, short, three-quarter, etc.
- And so much more needs to be taken into account.
We hope this gives you a few pointers to imagine all the other frameworks that go into creating a well-made pattern.
IV. FABRIC
How do you choose a suitable fabric?
Understanding different fabric content is very crucial to help you begin your process of designing. Your first goal is to figure out the fabric that best suits your vision before starting your clothing line or talking to a manufacturer. You can plug into our course on fabric content to give you the scoop on popular fabrics used in apparel, information about them, and how they will define your clothing designs and brand. Their qualities and grades must be carefully used in specific cases, which we’ve articulated for you to save you the headache of figuring out along the way. You can also order a KIT from AVmade.com to touch and feel fabric swatches we put together to educate our brand partners. Another way is to request products from your competitors and see if you too can have access to the same or better quality.
How do brands source fabric?
In a traditional way, before having access to the best clothing textile mills and KIT on AVmade.com, most designers went about starting a clothing brand through buying textile fabrics from wholesalers or, even worse, retailers. Buying textile at a wholesaler or retailer is a bad practice to start a clothing brand.

So if you are starting a clothing brand, then your primary goal should be to.
- Go directly to the source. No middlemen.
- Find the best textile mills
- Make sure the textile mills are capable of replenishing you anytime
If your goal is to secure a fabric that you can use on an ongoing basis, getting it from its primary source is beneficial to you in terms of price, quality, and consistency. It also gives you the ability to replenish whenever you need more. At AVmade, you’ll find the elite U.S.-based textile mills that can help you achieve these goals. We enable you to customize the textile fabric in any way you like, with low MOQ, no surcharge, or excess pricing.
We help designers cut out the middleman when starting or growing their clothing brand with all the design customization abilities while assuring high-quality, made in the USA textiles. We only allow hand-selected high-quality and high-performer textile mills that work with the high-end contemporary clothing brands.
In case of more elaboration, visit textile mills vs. wholesale to help you understand the importance of going directly to the source.
How do brands pay for fabric?
We discussed this process elaborately on fabric content and cost; we always say cost varies according to many factors. It is vital to consider each of these factors as you plan your budget for fabric cost, especially when starting a clothing brand for the first time. As you gain more experience, information such as these will be second nature.
Let’s say you decide to do a cotton jersey. Now you need to take these factors into account:
- Quality grades
- Quantity
- Weight
- Spandex or not?
- Is it for piece dye or garment dye?
- Laundered or not?
- Heatset or not?
- Compacted or not?
- all of these variables make a huge difference
There are also additional treatments that you can add, which can slightly increase your price. Depending on your brand’s mission, value proposition, or product use case, these treatments can enhance their customers’ experience.
- Antimicrobial
- Dry-wicking
- Organic dye
- & more
Another benefit of working with textile mills on AVmade.com is that you can cut out all the middlemen and work directly with a textile that will manufacture your fabric according to your needs. Our textile mill partners are in the USA–no wholesalers–so we’re transparent about prices, whether the buyer is a designer or the wholesaler. We also waive all surcharges and engineered tools to do customizations digitally. As far as cost goes, given the level of business we generate for our textile mills and being free to join our platform, our brands benefit 30-55% less than traditional textile mills costs.
So depending on what you’re looking to do, browse the different weight and yarn contents on AVmade Design Studio to determine what best suits your clothing design needs. We display all the information and pricing upfront to help you streamline your process.
Final takeaways for a designer,
- Never middlemen.
- Always go direct
- Always seek for the best quality,
- Be able to replenish as you desired.
Learn more about fabric contents
V. YIELDING
What is yielding and why is it important?
Clothing manufacturers calculate yielding after first making the pattern. Yielding lets the designer know precisely how much yardage a garment will require.
How to calculate yielding?
All professional clothing manufacturers will be able to provide you with yielding as long as you provide them the fabric width. When developing your garments using AV plus, then all cost is included by our factory partners since they are vertically integrated. Knowing your yielding is necessary if you decide to go on your own to manufacture your clothing or use a non vertically integrated cut/sew clothing manufacturer. Here are the two important variables you must remember.
- Fabric width determines how many pattern pieces can fit on a specific area of fabric. This often depends on the type of fabrics, but the most popular textile fabric widths are 52″, 56″, 58″, and 62″.
- Once width is determined, then it is time to calculate how far down a length of style will need to go. Fabric is sold by the yard, and a yard is equal to 36″, so any garment that is longer than 36” will be passing the one-yard value.
So when starting your product development, you will use a combination of Width x Length to calculate your fabric needs for each style. This will give you the amount of yardage needed per garment, which equals the value of dollars for fabric per item. This information will help you structure your unit economics, and it will also help when you place an order, so you can get the right quantity of fabric each time.
Yielding formula
Let’s use a standard men’s t-shirt made with a cotton jersey fabric. Will test our formula on,
- 60″ vs. 52″ wide fabric.
Let’s also add another important factor. The cost of the fabric,
- 60″ is $4.50
- 52″ is $4.25
At a glance, the price difference between the fabrics is in cents. But wait till we do our calculation.
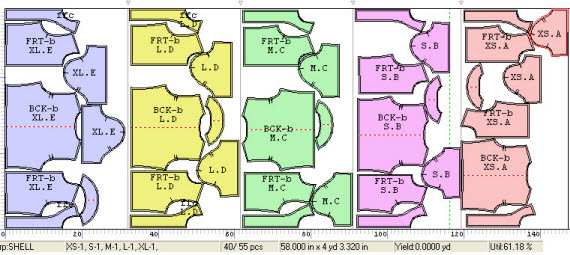
Now let’s lay out our pattern pieces in our fabric to determine the yielding output.
We’ve now determined the yielding for each fabric width.
- 60″ takes 1.1 yards.
- 52″ takes 1.4 yards.
Now, let’s calculate in terms of yield.
- (60″) 1.1 yard x $4.50 = $4.95
- (52″) 1.4 yard x $4.25 = $5.95
Some designers may not think much of it; after all, for most, $0.93 doesn’t seem like significant savings. But savvy entrepreneurs understand that is nearly a 20% jump.
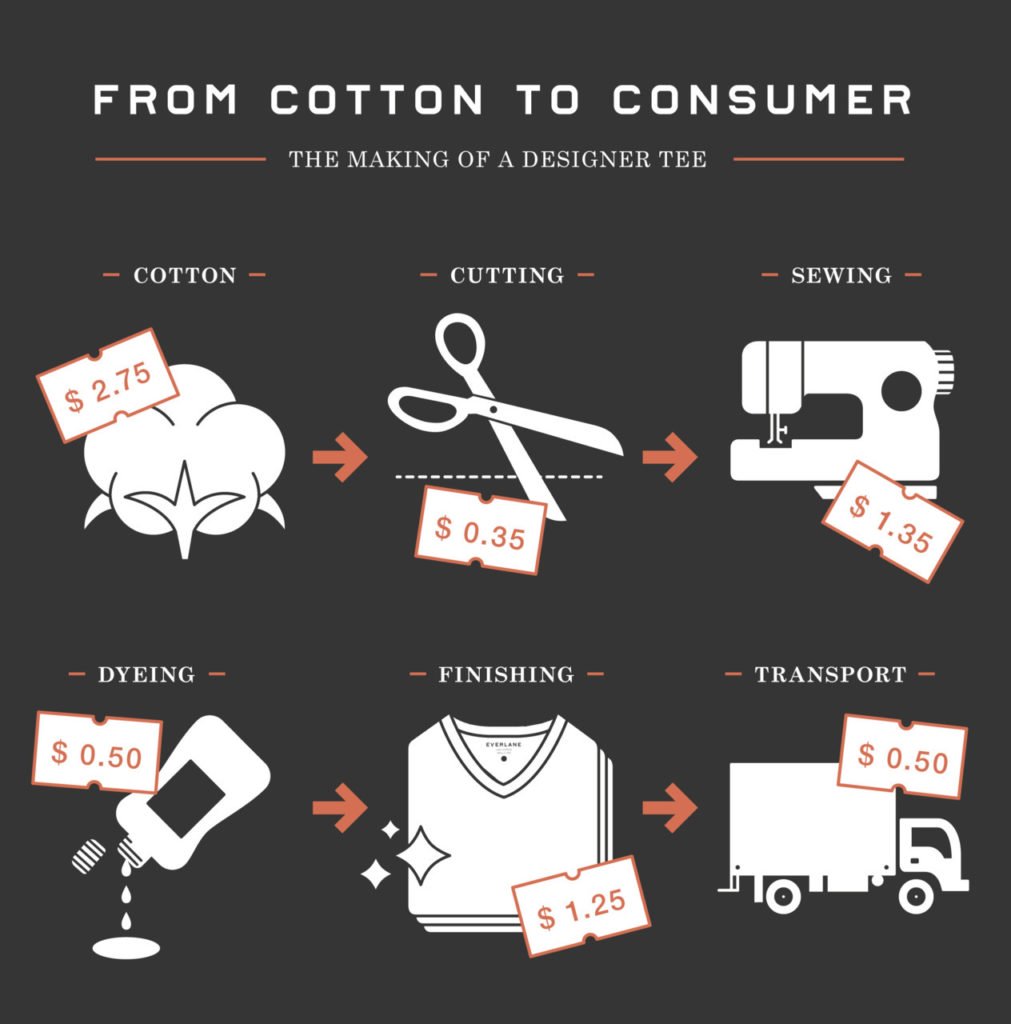
When it comes to manufacturing a basic garment like a t-shirt, all the cost variables go into the making.
- Fabric
- Cut
- Sew
- Dye
- Finishing
- Packaging material
- Hardware such as (main label)
- Transportation
Now let’s say,
- What’s the price difference in volume?
- What would happen if added 20% to each step of the process?
Let’s dive in and find out. The first scenario is simple; subtract $5.95 – $4.95 to get the difference then multiply it by the quality you want to produce. Let’s say we want to do 300 units.
- 300 x $1 = Overpaid by $300
In the second scenario, what will happen if added 20% to each part of the process? For this exercise lets fist pick a generic number say $14 for the standard overall garment cost,
- $14 x 20% = $17.50. Which is an increase of $3.50 for each garment.
- 300 x $3.50 = Overpaid by $1050
Remember, not every fabric has these options for you to buy in different widths, but it’s worth keeping this info in mind when you encounter opportunities.
VI. SAMPLE
What is a sample?
A “sample” is fashion industry terminology for what’s generally known as a prototype in other industries. It is part of the development process to evaluate the finished garment pre-production. We will discuss further the benefits a sample can provide.
How does sampling help fashion designers?
Depending on how you structure your organization when starting a clothing brand, you may or may not want a sample. Some designers who trust their manufacturer may not sample everything but will test more intricate designs. A sample is requested whenever you are unsure how the fit, fabric quality, or aesthetic will turn out.
Regardless, “samples” are available as an option when working with any legit clothing manufacturer. If you’re new to the fashion industry, we highly recommend that you sample products you like. On AVmade, you will find various types of samples to choose from based on your budget or needs. There are also incentives we offer designers that all our factory partners take parts in. For instance:
- We offer multiple types of samples—for you to choose from, such as fabric swatch, group order, partial and complete custom
- Saving up to 85%
- Members discount up to 25%
Samples and discounts are mandatory on AVmade Design Studio for clothing manufacturers to provide entrepreneurs without any exceptions.
Many designers would initially like to see a sample, especially a startup just starting a clothing line, to evaluate the following:
- Does the garment look like it’s well-made in terms of stitching and overall aesthetic?
- Is the visual aesthetic on a ‘Fit Model’ what they envisioned?
- Does the feel of the fabric and material match the quality standards you need?
Do not try samples on yourself, but rather on a fit model whose measurements are accurate to the sample size.
How do designers estimate prototype cost?
Pricing will vary slightly based on the clothing manufacturers, fabric quality, and style types (such as t-shirts vs. jeans).
If you take a t-shirt, for example, consider this:
- A legit clothing manufacturer will base its price on making a pattern, fabric cost, time to cut & sew samples. The entire process starts to finish, can cost between $250-$300.
- We’ve heard unbelievable stories, such as designers who paid $750+ for developing a t-shirt. In our opinion, that should be illegal since that is highway robbery! Unfortunately, where there is no marketplace transparency, it’s pretty much the wild wild west.
- On AVmade Design Studio, the price for sampling a t-shirt, including pattern, fabric, cut & sew, is around $95. Most of our factory partners will additionally give discounts up to 25 to win our brand partners’ loyalty, which means 80-90% below standard market price.
If you ask, “Why does AVmade Design Studio give such a discount and other perks?” Simply, we only partner with factories whose love and support our mission. Most factories on AVmade have been our partners for over a decade. We’re building our brand with longevity in mind to help emerging brands create a household name. We know your success is our success; therefore, we let our action speak for itself.
JUST ABOUT READY TO START MANUFACTURING YOUR CLOTHES…
VII. GRADING
What is pattern grading?
Grading is a process that creates size increments (+/-) measurements applied using a CAD system to the original pattern. Grading applies size diversification instead of creating a pattern for each additional size needed. An elaborate example would look like the following:
- Jenny gave her clothing manufacturer a spec to follow to create a size Medium t-shirt.
- Once the pattern is made and approved, she asks her manufacturer to grade it between XS-XL.
- The factory then applies the appropriate modification to each required size without distorting it proportionally.
All clothes must go through a grading process unless it’s one size fits all garments. As discussed in the tech pack process, your tech pack should have a base size in the middle of the size range you are looking to mass-produce. For example, if you are planning to mass-produce XS, S, M, L, and XL, then best to develop a size M pattern, so in grading, the proportions and scale are above 99% to accurately fit all your customers. Most contemporary non plus size designers make their pattern in size M for men and S for women. Do not try samples on yourself, but rather on a fit model whose measurements are accurate to the sample size.
All clothing manufacturers on AVmade must use our standard contemporary market size charts unless requested otherwise by a designer. It’s rare for a designer to require a different size chart as many modern brands follow the same measurement chart. Once the clothing manufacturers apply the requested size variation, meaning once the grading for the t-shirt is in place, we are one step closer to start sewing.
How much does pattern grading cost?
Generally speaking, the price for grading can range anywhere from $75 for a very basic garment, and it goes up to $95+ for complex styles.
Unfortunately, it is not uncommon for most pattern makers to demand a much higher price to apply to grade. Many charge an astronomical fee for their service. Generally speaking, since most pattern makers don’t acquire customers regularly, they will push for a grand slam of a margin on the customer they convert. We hear stories like designers paying $300-$400 for grading, ouch. Unfortunately, startups have to bear a burden.
Another one of the perks of working with our factory partners on AVmade.com is that not only will you avoid being overcharged, but the grading fee is reduced on average by 50% or waived entirely.
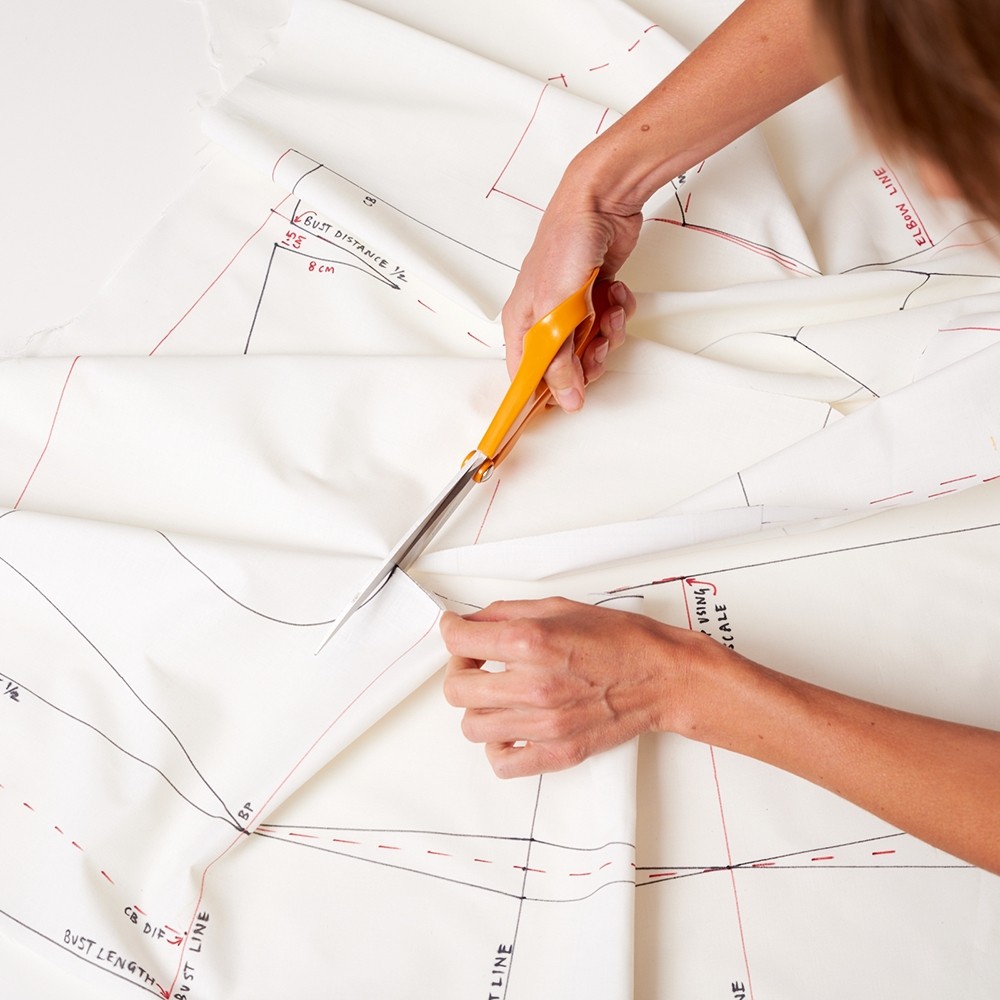
VIII. MARKER
What is a maker?
A marker is a repeat of the graded pattern pieces placed tightly next to each other using a CAD system to make the cutting part of the manufacturing process cost-effective and efficient.
It is done by first identifying the number of units the designer wants to produce that particular style. To articulate the process, let’s use an example to show you the information that is needed,
- A digital file for the graded style.
- A total number of units: Ex. 300 units
- Size breakdown: Ex. 80XS, 80S, 120M, 10L, and 10XL.
The general rule of thumb when creating a marker the pattern makers need to apply is,
- All pattern pieces are on the grainline,
- Mixing sizes are ok as long as the quantity of the sizes is the same. If not, a single market will be required.
When the factory has all the necessary information, they will use the graded sizes and combine them using a CAD system to create a production marker.
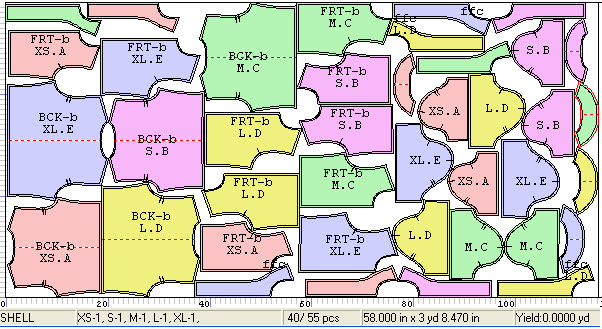
Once the marker is created, it gets plotted for the cutter to use as a blueprint to begin the garment cutting process. It is vital to make sure the garment cutter doesn’t waste any fabric before cutting the fabric. See below for the technical details that will help you clarify and define the concept.
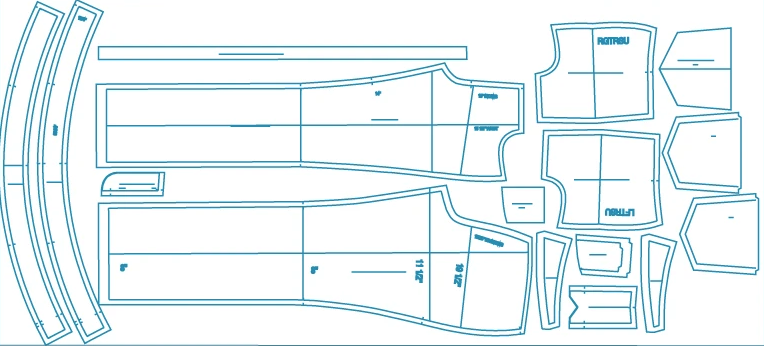
Cost of marker & its purpose
Let’s start with what a marker maker does once the clothing manufacturer is ready to proceed with production.
- Prepare the graded pattern and separate every piece into individual pieces.
- Color coordinates each size to identify them quickly.
- Based on the width of the fabric and quality order, they will now create something that looks very much like a jigsaw puzzle-like you saw above or below.

A marker cost on average for a basic style like a t-shirt is around $65-75. But as we said in the grading process, the price is very dependent on the clothing manufacturers. We have heard stories, clothing manufacturers charging $225 for a t-shirt marker (smh). Like everything else, another perk of working with clothing manufacturers on AVmade is that all our factory partners provide makers for a fraction of market cost or altogether remove the fee.
The purpose of having a marker is due to efficiency. No one likes waste, especially wasting money when starting a clothing line. So the reason a professional designer requests for a marker is to achieve the following:
- Reduce the amount of Fabric needed in production, which equates to saving money for material.
- Since cloth manufacturing is priced based on the time needed, a marker guarantees the cutting time to drop significantly.
Please note, a marker is reusable as long as you continue producing the garment in the same size ratio.
How much does a marker save you?
Let’s show you some significant savings when an apparel clothing manufacturer does a marker right!
To put into perspective the number of dollars you will save, let’s use a standard men’s t-shirt, size Medium, based on a 62″ Fabric cuttable, and wants to produce 300/units, as an example.
- Standard yielding without the marker is 1.25 yards per t-shirt.
Now a marker is made using a digital computation system by mixing pieces as we mentioned above and placing them very lose to each other like a jigsaw puzzle.
- It has now reduced it to .90 yards.
(1). Fabric cost saving.
- Let’s say the Fabric was an average of $6. Then the math is (300×1.25x $6) – (300×0.90x $6) = $630 Saved
(2). Cutting cost saving.
- If there is no marker, then it would generally take a cutter 6 hrs to cut. Also, based on the industry hourly average, a garment cutter charges about $75 per hour. This means the cutter would charge around 6hr x $75 = $450.
- If a marker is available, the time needed is slashed drastically to about ⅓, which can mean 1.5-2hrs x $75 = $150—saving you another $300. A marker is a magic ingredient to fast-track your production and save cash.
TOTAL SAVING for having a marker is: $750
What’s the difference between a single and mixed marker?
It starts with identifying whether the production quality is small or large. If it is a small production, the clothing manufacturer usually makes something called a single marker. A single marker is best suited for a small production or a production that has all the sizing ratios distributed equally.
- Example of a production quantity best for a single maker. [XS: 50] [S: 50] [M: 50] [L: 50] [XL: 50] [2XL: 50].

If the quantity is much larger and the size ratio is more consistent, the clothing manufacturer will create a more elaborate marker (mix marker).
- Example of a production quantity best for a mix maker. [XS: 20] [S:35] [M: 55] [L: 55] [XL: 35] [2XL: 20]. In this case, the factory can mix markers for optimal fabric savings using the formula to combine the following sizes [XS & 2XL], [S & XL], and [M & L].
If you are not sure the direction to take, let the clothing manufacturer determine the type of Marker you need.
As stated earlier, manufacturing pricing always relies on the amount of time needed for each part of the manufacturing process. So getting the correct type of Marker can be even more cost-effective and efficient on the backend as per piece cost will drop.
Learn the step-by-step list a clothing manufacturer takes to produce an item.
IX. READY FOR SEWING
Is your clothing brand ready for manufacturing?
Now assuming you’ve been listening and learning, you should have all of the processes in place to get to the fun part. The next step is to begin your production process. So to help you fast track your understanding of the clothing manufacturing process, you can also read Apparel Production Process & Cost.
We’ll always be here to walk you through what to expect to ensure your journey to growing your brand is successful. If you work with clothing manufacturers outside of AVmade, make sure all the information we touched on previously, such as having all the pertinent information & tools to have a successful production, is in place.
- Techpack
- Pattern
- Fabric
- Yielding
- Sample
- grading & marker
Remember, working with AVmade factory partners gives you access to the USA’s top 1% of factories. You can design on top of the pre-developed products on AVmade.com to fast-track your production process extensionally and cost-effectively. If you can’t find what you are looking for, you can submit your concept on AV Plus for our factory factories to bid and provide you with full-package pricing. AVmade partnership emphasizes transparency; therefore, factories will provide a breakdown of cost each time. We hope you join us, and we can earn your trust as you build your brand for all your superior quality product needs.
X. PRODUCTION COST
How to calculate clothing manufacturing cost?
The rule of thumb in cloth manufacturing relies on a set of reasonably consistent factors. When you look to estimate your cloth manufacturing costs use the bullet points below to guide you.
DEVELOPMENT COST
- Pattern
- Fabric
- Cut & Sew sample
- Dye sample
FABRIC COST
- Fabric quality
- Does it have spandex? (cost will be higher)
- Fabric quantity
- Fabric weight
- Are you buying from the textile mill, wholesale or retail
CUT & SEW COST
- Production quantity
- Thread count (the higher the thread count, the more expensive)
- The complexity of the garment (more detail equals money)
- Are you going direct to the factory or using an agency
DYING COST
- Number of units per color
- Regular or organic dye.
OTHER COSTS
- Grading
- Marker
- Plotting
- Labels (care labels and main label)
- Hardwear
- Transportation
To further clarify, we have modeled two types of formulas, which we call the Traditional formula & It’s that simple formula. The difference between these two formulas is articulated below. We used fictional pricing examples for material, Hardware, and transportation to show you how the method works.
TRADITIONAL FORMULA
- Material cost
- Hardware
- Labor cost
- Duties
- Transport
Let’s break down the process in thorough detail by using a t-shirt example to help you stop guessing and see the numbers in action.
1. Material
It is the cost of your fabric, calculated based depends on the following factors:
- What’s the yielding for the style?
- Then, (yielding x price per yard) = material cost
- So let’s say the jersey fabric for the t-shirt is $5/yard, and it takes about 1/yard to make a t-shirt.
- Then you calculate the cost this way: ($5 x 1) = $5.00
Material cost, in this case, will be $5.00
2. Hardware
It represents various elements needed to create your garment, depending on the project. We will list what a t-shirt needs, but it can also include zippers, buttons, and other ornamental items. For a basic non accessorized t-shirt, you will only need the following:
- Care-label : $0.50
- Main label (branded label inside the back neck of your tee shirt including sewing: $2.00
3. Labor
Here is where it gets a little elaborate, but don’t worry, we’ll make it easy to understand. Let’s list what is considered labor.
- Cut & sewing per garment : $4.50
- Graphic printing (if needed) per garment
- Dying per garment: $2.00
- Finishing: $1.50
Specific processes will require surcharges (for instance, if you don’t meet an absolute minimum item, a production facility will charge additional dollars).
For projects like graphic printing, there are set up fees and screen charge fees that you need to add up and divide the cost by the number of units you’re producing, then add the production price per piece.
- For example, let’s say you’re creating silk screen graphic prints at 150 units, the printer charges:
- $3.50 per unit to print
- $75 for graphic design
- $50 to burn the screen
- $35 for setting up (below 300 units)
- The formula will be : (Cost of design + Screen + set up) / number of t-shirt+ cost to print.
- ($75+$50+$35) /150 +3.5 = $4.57
You can use this formula across anything regarding surcharge and general production facility fees and surcharges.
4. Duties
It only applies if you are dealing with an overseas company.
- Fob (freight on board) fee
- fuel costs
- tariff costs
- custom broker fees
- custom duty fees
Our brand mission is to stress the importance of quality, transparency, sustainability, speed, and cost with no middlemen. It is why we’re adamant about working only with factory partners from the USA. For further information on overseas import fees, speak to a courier like DHL.
5. Transportation
It involves how your production will be picked up from the clothing manufacturer’s facility and dropped off at your facility. Various methods are available depending on the volume of the product and your location.
For the sake of simplicity and to give you an example, we will use the same concept and base it on the 300 units that we’ve been discussing so far.
Total number of units / shipments cost or transportation = $x per item 300/ 150 = $0.50 per item.
Now you will add all the totals (Material cost + Hardware + Labor cost + Duties Transport) =
.
COST OF PRODUCTION.
“IT’S THAT SIMPLE”
Our trusted “It’s That Simple” Formula is AVmade standard formula for calculating production costs for modern-day entrepreneurs building their brand.
- No development cost: it is pre-developed by our factory partners. You can request a sample at a rate up to 90% less than traditional factories charge.
- Fabric cost: has been included.
- Cut & sew: cost is included.
- Dye cost: is partially included.
- Other costs: are included except the main label.
- All the prices are displayed upfront based on MOQ and custom preferences.
- com allows you to skip all the mediocre, time-wasting, grunt work and dive right into (production cost * markup). You can filter and sort by product type, fabric type, pricing, and more to streamline your process. It’s that simple. Really!
At this point in the game, like many startups before you, you’re probably wondering how much to price it? Below are methods we consider highly successful for many current, modern-day designer brands that sell direct-to-consumer rather than wholesale. See below for our guidance.
XI. PRICING YOUR PRODUCT
How much markup to add when starting a clothing brand?
Now that you know what your expenses are to produce your garments, here comes the fun part. There are a couple of different pricing models for you to follow. Based on our experience, we focus on an approach that works for most direct-to-consumer brands. You’re welcome to experiment and give other formulas a test drive, but here are our two cents.
We recommend adding a flat markup percentage somewhere between 200-250% to your production cost. If you are going after a niche market and planning to do extensive marketing, you may need to rethink how to recoup that investment. An example of this will be a brand like “Supreme“; since they do a collab with an artist or mega brands which cost in licensing fee and marketing to build momentum millions of dollars, they can do a 1000% markup. But to achieve success on a high margin, you must have a marketing strategy beyond the norm and a niche market with a lot of money that you’d have to entice somehow to get behind your brand. Otherwise, slowly but surely build your brand and business model, and as you scale, you can experiment.
There are other online formulas of a markup calculation that sounds like they’re re-inventing Einstein’s general relativity equation (smh). But, why the calculus class? Just skip the crazy mathematical gymnastics and do the following :
- Total cost x markup percentage = Your retail price.
- Then round it up. (*Note that a study conducted at MIT concluded humans like the numbers 5 and 8 when shopping. Conduct your experiment when you price it out and see if you can either end with 5 or 8 and test it.)
- Do not add marketing dollars to your cost, but rather make sure your quality and product offering is excellent. CAC (customer acquisition cost) is something you bear initially, but as you increase your LTV (lifetime value of a customer), you will recoup that investment.
- An example, if it costs you to acquire a customer $5 initially but later if the same customer comes back to buy for the second time, you can now divide the $5/2, which is no longer $5 but rather $2.50. If that customer keeps coming back for a third and fourth time, you can see each repeat purchase slash your CAC If you initially added to your product thinking your CAC is $5, then your business savvy competitor can outprice you. So what’s important is that you keep quality and service high to make sure your customers keep coming back.
Let’s give you a couple of ways founders go about finding price market fit. To keep things simple, let’s use a t-shirt, and let’s say the production cost all-inclusive was $13. You can add a markup percentage or work backward from the price you want to retail to find your Price market fit.
ADDING markup percentages until you feel confident with the price you would like to offer your product.
- $13 (Production Price) x 200% (2) (Ideal Markup) = $26
- $13 (Production Price) x 225% (2.25) (Ideal Markup) = $29
- $13 (Production Price) x 250% (2.5) (Ideal Markup) = $33
WORK BACKWARD starting with the price you’d like to sell it, then dividing it by either your cost or margin until you feel confident.
Price / Markup
- $25(ideal Retail Price) / ideal markup 225% (2.25) = 11
- $30(ideal Retail Price) / ideal markup 200% (2) = 15
- $30(ideal Retail Price) / ideal markup 250% (2.5) = 12
Price / production cost
- $28 (Production Price) / Production cost 13 =15 (215%)
- Once you’ve done your R&D to determine your retail price, you can work back using your margin as an anchor to determine the maximum production price you will need to pay. As a start-up, given your lack of volume, you may get a lower margin to start with, but as you scale, your margin will continue to improve since your production cost and CAC (customer acquisition cost) will continue to go down.
Not every product you offer has to fit in one box in terms of markup, and there is always room for you to play with going up or down to see if garments sell better at one price versus the other.
Your crew necks may be a 220% markup, while your v-necks are 235%. Maybe tank tops sell well at 250%, while your sweaters, a more expensive item anyway, only need a 200% markup. You’ll know which of your unique pieces can carry more markup once you’ve done your homework to understand the competitor’s pricing strategy. When the products you sell include enticing features (pocket on tees, graphics, etc.), you can slightly increase the markup percentage. But always test and don’t rush changing prices daily. It takes time to learn, and if you’re new, we suggest that you do a competitive analysis followed by surveying your core customer base as you experiment.
Remember, your goal is to get products in and out quickly. There is a FIFO strategy (first in, first out) in inventory management, and it is great to apply it in your operational process. Learn to play with numbers and incentivize customers without being salesy or sleazy.

CONCLUSION ABOUT STARTING A CLOTHING BRAND
Building a brand has many moving parts, especially in apparel manufacturing. Learning the ropes to make products superbly requires years of experience and connection, but with the “A-team” on your side, you can take the bricks out of your briefcase and spend time building, marketing, and providing the best customer service to scale your brand.
If you plan to go outside of AVmade to manufacture, make sure you hire at least a production manager with extensive experience and network. It is crucial to have someone that can consistently stay on top of the production process, whether internally or outsourced. A lack of production manager is where most brands end up never scaling. Also, be sure before anything else, quality, lead time, and cost align before production begins.
Cloth manufacturing is brutal since things are constantly going wrong. Unfortunately, most factories are unreliable, and there are about 20 steps from start to finish where one mistake can leave you exposed and bleeding money if you are not careful. A production manager will make sure each step is done correctly by tracking quality, time, and the overall process in a spreadsheet daily. Our team of founders and executives with decades of combined experience can tell you it is not easy. The hardest part of starting a clothing brand is to get the manufacturing process well structured.
AVmade Design Studio’s focus is to alleviate the headache, workload, and cost of manufacturing emerging brands have to endure. We only allow elite U.S.-based clothing manufacturers on our platform and No middlemen. All clothing manufacturers on our platform undergo extensive evaluation and training using our Kanban production system, which we’ve been perfecting for over a decade for optimal quality and efficiency output.
The reason why most successful brands succeed is no secret. Nearly all successful founders move their business forward by staying creative while their team handles the daily tasks. On the other hand, most startups are not fortunate to have that type of capital to hire a team of experienced candidates to help build their brand. Therefore, it’s common when starting a clothing brand; most founders find themselves juggling a million tasks daily and putting out fires regularly.
All the founding teams on AVmade know all about the ramen noodle grind. We believe we have what it takes to build a community and a support system to give our brand partners the leverage needed to succeed.
FAQ
How long does the development process take?
Clothing development, “aka” pre-production prototyping lead time, varies between manufacturers. It is primarily due to capacity and garment style’s complexity. A t-shirt will take less time to develop than a dress, while jeans may take more time than a t-shirt or a dress.
Suppose we take a medium complex item as an example. A clothing manufacturer’s locates overseas will take 8-12 weeks on average, from start to finish. An efficient and experienced clothing manufacturer in the United States can develop the item within 6-8 weeks. In comparison, our factory partners on AVmade take on average around 2.5 weeks.
How to avoid mistakes when starting a clothing brand?
To keep in mind, those just starting a clothing brand must take it slow and go through the learning curve. The entire learning process is best when it’s experience-based. But most of the failures we see that are constantly occurring will be;
- Over producing without any demand
- Throwing a lot of money at so-called professionals (marketing, PR, digital ad agencies, etc.) without pushing yourself to first learn the fundamentals.
- Starting a brand while underestimating the amount of griding it requires to succeed
- Starting a brand without a passion and a love for it, etc.
Your goal is to make it through the learning curve and become a seasoned entrepreneur, so the sooner you dip your feet in and start to learn as much as possible, the quicker you gain that experience. You can’t learn as an entrepreneur if you’re sitting around waiting for others to do it for you.
Do not spend all of your life savings in one go at the first production run. Carefully spend your money to test product/s, so you can begin to understand,
- The product development and iteration process
- The selling process
- The customer service process
- The advertising process
- The digital marketing process and so forth to build your brand
Just be OK with making mistakes, as this is part of the entrepreneurship process. Like everything else, once you have enough experience under your belt and go through the process of being hands-on for a few months, it will get easier.
It is important to note that it is always best to ask for a sample to conduct a fitting to make sure you like the style and the fabrication in person before placing a production order. After requesting a sample, the major misstep to avoid is,
- Not fitting it on the correct body type
Let’s say your clothing manufacturer made you a sample in size Medium. Now you have to make sure you enlist the help of a fit model that is a true size medium to test how appropriate the fit is. It is essential to Fit it on someone who is a “true” size medium. Use the American standard size measurement size guide or a “fit model agency” to ensure the person fitting the sample has a very close size range to the factory size sample. If you use a fit model agency, the standard rate is $80-100/hr, but within an hr, you can test around 5-10 styles depending on the complexity of the style and your experience. A negative domino effect will follow when you do the fitting process wrong, which later will translate into a higher percentage of returns.
All the garments developed on AVmade.com go through rigorous development and fittings by our factory partners and then our internal team. We use professional fit models to ensure the product placed on AVmade.com is superior in every way.
How Fashion Designers Design Clothes